


Hello World !!
Overview
We live in a globalised world, So we need our web applications to reach as wide an audience as possible. To do that, there are some cases in which language comes as an issue/problem where some people can't understand one language but they do know their local/native language. So, if our app works with specific user-friendly language then we can reach a large number of users and convert them into valuable consumers of the app.
Here, the concept of Internationalization (i18n) comes into the picture. In this blog post, we'll explore the concept of internationalization and dive into how Spring Boot simplifies the process of creating applications that can easily adapt to different languages and regions as per our needs.
In this app, we will add support for 3 languages English, Hindi and French.
What is Internationalization (i18n)?
Internationalization (also known as i18n) is the process of developing and designing applications to support multiple languages as needed.
"i18n" - The term i18n comes from the number of letters between the "i" and "n" in the word "internationalization"
Internationalization allows developers and businesses to expand their user base and reach a large audience with their specific user experience of languages.
Why is i18n Important?
i18n can help you:
Increase your user base
Increase user experience
Comply with local regulations and accessibility
Spring Boot and i18n
Now, we will see how we can develop i18n using Spring Boot.
Spring Boot makes it simpler to implement i18n in any application. Let's explore steps to internationalize a Spring Boot application.
Create a new Spring Boot App
To create a new spring boot app you can use IDE editor or you can use spring initializer.
Once you visit the link, you can see something like this,

Here, you can update version-related things and also give spring boot application related information. Also, you can add dependencies from here or you can also add them later in the pom.xml file.
Once done, generate and download the project and open it in IDE.
Dependencies Add
Now, we need to add one dependency in pom.xml file to create REST APIs. We are using Maven as our build tool.
<dependency>
    <groupId>org.springframework.boot</groupId>
    <artifactId>spring-boot-starter-web</artifactId>
</dependency>
Create Language Resources
Now, as we need to add 3 languages support, we need to create three properties files under the resources folder as per languages
```
└───resources
    └───i18nSources
    │    └───languageSources
    │    │    messages_en.properties
    │    │    messages_fr.properties
    │    │    messages_hi.properties
```
As you can see, we have created folders i18nSources/languageSources inside resources and in that folder, we have created three properties files as per our languages.
messages_en.properties
This file is used to store English contents and we will use this file when we want to serve English app users.
# messages_en.properties
welcome.message=Hello
language.file=English File Called
messages_fr.properties
This file is used to store French contents and we will use this file when we want to serve French app users.
# messages_fr.properties
welcome.message=Bonjour
language.file=French File Called
messages_hi.properties
This file is used to store Hindi content and we will use this file when we want to serve Hindi app users.
# messages_hi.properties
welcome.message=\u0928\u092e\u0938\u094d\u0924\u0947
# reads to "नमस्ते"
# Need to convert Native to ascii for Hindi words (Ex. native2ascii)
language.file=Hindi File Called
Make sure for Hindi text we convert to ASCII values from native.
MessageSource Configuration Layer
As of now, we have created resource bundles (language properties files). Now, we need to add a configuration to pick basename for ResourceBundleMessageSource and generate bean for MessageSource.
// LanguageConfig.java
package io.github.sahilrajput2223.spring_boot_internationalization.config;

import org.springframework.context.MessageSource;
import org.springframework.context.annotation.Bean;
import org.springframework.context.annotation.Configuration;
import org.springframework.context.support.ResourceBundleMessageSource;

@Configuration
public class LanguageConfig {

    @Bean
    public MessageSource messageSource() {
        ResourceBundleMessageSource resourceBundleMessageSource = new ResourceBundleMessageSource();
        resourceBundleMessageSource.setBasename("i18nSources/languageSources/messages");
        return resourceBundleMessageSource;
    }

}
here, we have mentioned our basename of message resource bundles as i18nSources/languageSources/messages because we have created a folder structure like that and our properties file naming pattern is messages_XX.properties and XX is a specific language code to identify.
REST Controller Layer
Now, we have completed all setup and we can create our REST API to fetch details based on Accept-Language Header.
// SpringBootInternationalizationController.java
package io.github.sahilrajput2223.spring_boot_internationalization.controller;

import io.github.sahilrajput2223.spring_boot_internationalization.response.HelloResponseDTO;
import io.github.sahilrajput2223.spring_boot_internationalization.service.SpringBootInternationalizationService;
import org.springframework.beans.factory.annotation.Autowired;
import org.springframework.http.ResponseEntity;
import org.springframework.web.bind.annotation.GetMapping;
import org.springframework.web.bind.annotation.RequestHeader;
import org.springframework.web.bind.annotation.RestController;

import java.util.Locale;

@RestController
public class SpringBootInternationalizationController {

    @Autowired
    SpringBootInternationalizationService springBootInternationalizationService;

    @GetMapping(value = "/api/user/hello")
    public ResponseEntity<HelloResponseDTO> getHelloMessageBasedOnLanguage(
        @RequestHeader(name = "Accept-Language", required = false) Locale locale) {
        return springBootInternationalizationService.getHelloMessageBasedOnLanguage(locale);
    }
}
here, we have created one GET API having api/user/hello endpoint. Also, we have added @RequestHeader(name = "Accept-Language", required = false) Locale locale in API logic to fetch language header information and pass it to the service layer so that we can use that to fetch language-specific values and messages later.
Service Layer
In the service layer, based on locale header we are going to fetch values from the messages resources bundle as per languages.
// SpringBootInternationalizationService.java
package io.github.sahilrajput2223.spring_boot_internationalization.service;

import io.github.sahilrajput2223.spring_boot_internationalization.response.HelloResponseDTO;
import org.springframework.beans.factory.annotation.Autowired;
import org.springframework.context.MessageSource;
import org.springframework.http.HttpStatus;
import org.springframework.http.ResponseEntity;
import org.springframework.stereotype.Service;

import java.util.Locale;

@Service
public class SpringBootInternationalizationService {

    @Autowired
    MessageSource messageSource;

    public ResponseEntity<HelloResponseDTO> getHelloMessageBasedOnLanguage(Locale locale) {
        HelloResponseDTO helloResponseDTO = new HelloResponseDTO();
        helloResponseDTO.setMessage(messageSource.getMessage("welcome.message", null, locale));
        helloResponseDTO.setLanguageCalled(messageSource.getMessage("language.file", null, locale));
        helloResponseDTO.setStatus(HttpStatus.OK.value());
        helloResponseDTO.setHttpStatus(HttpStatus.OK);
        return new ResponseEntity<>(helloResponseDTO, HttpStatus.OK);
    }
}
here, we are fetching messages from the resource bundle using messageSource.getMessage() method and as param we are passing the key for that message and locale param for language. Based on that we will get specific messages in specific languages.
Also note that we have created on POJO class named HelloResponseDTO.java to give a response from API.
// HelloResponseDTO.java
package io.github.sahilrajput2223.spring_boot_internationalization.response;

import org.springframework.http.HttpStatus;

public class HelloResponseDTO {

    private HttpStatus httpStatus;
    private int status;
    private String message;
    private String languageCalled;

    public HelloResponseDTO() {
    }

    public HelloResponseDTO(HttpStatus httpStatus, int status,
                    String message, String languageCalled) {
        this.httpStatus = httpStatus;
        this.status = status;
        this.message = message;
        this.languageCalled = languageCalled;
    }

    public HttpStatus getHttpStatus() {
        return httpStatus;
    }
    public void setHttpStatus(HttpStatus httpStatus) {
        this.httpStatus = httpStatus;
    }
    public int getStatus() {
        return status;
    }
    public void setStatus(int status) {
        this.status = status;
    }
    public String getMessage() {
        return message;
    }
    public void setMessage(String message) {
        this.message = message;
    }
    public String getLanguageCalled() {
        return languageCalled;
    }
    public void setLanguageCalled(String languageCalled) {
        this.languageCalled = languageCalled;
    }
}
Done with coding, Let's test now
Now, that we are done with our coding part, let's run the project.
Once you run the project, you can see something like this,

that means, the project is started successfully.
Now, we are going to use Postman to call APIs and check responses as requested in the header.
Default Language - No Accept-Language Header
if you do not pass Accept-Language header then default English language is going to serve as an API response.
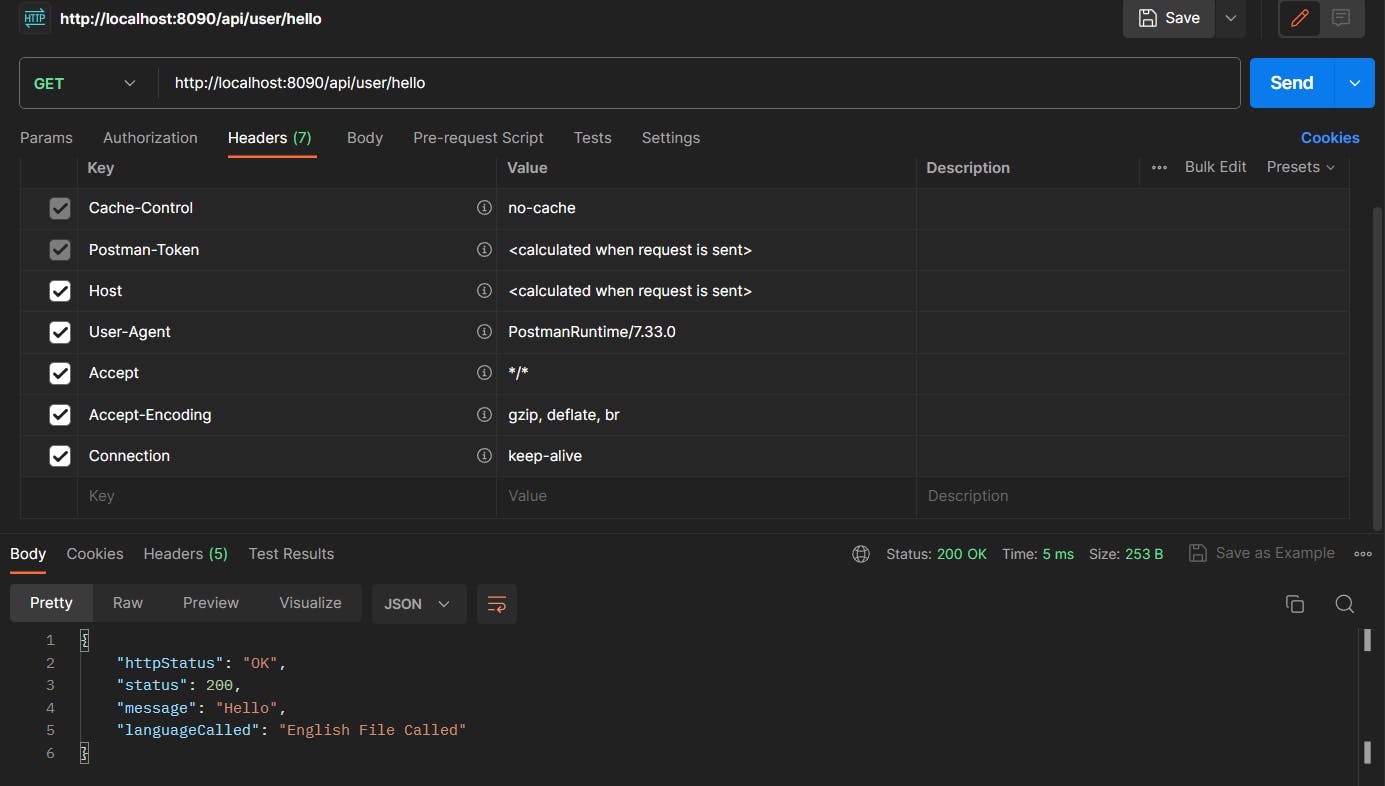
as you can see in the above image, we are getting messages in the English language.
English Language - Accept-Language Header set to en or en-EN
if you want API response in English language then in Accept-Language header you need to set to en or en-EN

as you can see in the above image, we are getting messages in the English language and we have set Accept-Language Header set to en-EN.
Hindi Language - Accept-Language Header set to hi or hi-IN
if you want API response in Hindi language then in Accept-Language header you need to set to hi or hi-IN

as you can see in the above image, we are getting messages in the Hindi language and we have set Accept-Language Header set to hi-IN.
French Language - Accept-Language Header set to fr or fr-FR
if you want API response in Hindi language then in Accept-Language header you need to set to fr or fr-FR

as you can see in the above image, we are getting messages in the French language and we have set Accept-Language Header set to fr-FR.
Source Code
GitHub Source Code Link: Click Me
Conclusion
In today's interconnected world, internationalization (i18n) is not just a choice; it's a necessity for applications looking to make a global impact. Spring Boot, with its robust support for i18n, streamlines the process of creating applications that can seamlessly adapt to various languages and opens doors to a broader audience.
Thank you for reading, I hope you found this article useful.
If you enjoyed reading, please consider following me here on Hashnode and you can reach me at Twitter / GitHub / LinkedIn.